To use a foam roller, position the cylinder beneath the target muscle group and use your hands and feet to support your body weight on the floor. Slowly glide your body back and forth along the length of the muscle belly, pausing on sensitive tender spots until tension eases. Breathe steadily throughout each movement, keeping your muscles relaxed rather than bracing against discomfort.
This guide explains how to roll major muscle groups safely, key body areas to avoid, and two targeted recovery tools to pair with your routine for spots a roller misses. Listings were collected 10 October 2026.
This article is informational and is not medical advice. Foam rolling applies direct pressure to muscular tissue. Do not roll over bones, joints, the neck, the spine, major arteries, or acute injuries. Stop immediately if you experience sharp or radiating pain, numbness, or tingling. Consult a physician or physical therapist before starting if you have circulatory issues, osteoporosis, or chronic joint conditions. See our Medical Disclaimer.
Chillveda earns a commission when you buy through links on this page, at no extra cost to you. As an Amazon Associate I earn from qualifying purchases. Affiliate disclosure.
Quick picks
-
1
 Thrival Relief Pro, Psoas Muscle Release Tool Chill Score 9.5/10Check price on Amazon
An adjustable ABS plastic board with interchangeable heads locking into five positions per side for targeted psoas and hip release.
-
2
 LiBa Back Massager Trigger Point Cane Chill Score 9.4/10Check price on Amazon
A manual plastic trigger point cane shaped with curved therapy knobs to reach tight muscular knots across the back and shoulders.

An adjustable ABS plastic board with interchangeable heads locking into five positions per side for targeted psoas and hip release.
Pros & ConsViewHide
Pros
- Adjustable heads lock into 5 positions per side
- Durable ABS plastic base board
- Detailed instruction manual included
- Targeted design for deep hip and psoas muscles
Cons
- No warranty term is stated
- No safety certifications stated
- Dimension contradiction between 17 by 6 inches and 18.22 by 14.65 inches
- Soft elastomer comfort covers must be purchased separately
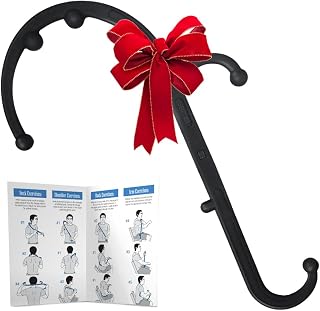
A manual plastic trigger point cane shaped with curved therapy knobs to reach tight muscular knots across the back and shoulders.
Pros & ConsViewHide
Pros
- Lightweight plastic frame weighing 1.3 pounds
- Curved hook reaches between shoulder blades
- Manual operation requires no batteries
- Multiple pressure knobs along the frame
Cons
- No warranty term is stated
- No safety certifications stated
- Spec table erroneously lists Heat and Massage Ball
- Dimension contradiction between 26.04 inches and 10.25 inches in height
More to compare
 Amazon Basics High Density Foam Roller for Exercise andCheck price on Amazon
 Amazon Basics High-Density Foam Roller for ExerciseCheck price on Amazon
 TRIGGERPOINT Performance Therapy Grid Foam Roller for ExerciseCheck price on Amazon
 TRIGGERPOINT Performance Therapy Grid Patented Multi-DensityCheck price on Amazon
 ProsourceFit High-Density Firm Foam RollerCheck price on Amazon
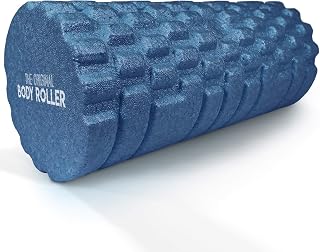 The Original Body RollerCheck price on Amazon
How to use a foam roller on major muscle groups
| Muscle group | Body position | Movement pattern |
|---|---|---|
| Calves | Seated on floor, roller under lower leg | Roll between ankle and knee crease |
| Hamstrings | Seated on floor, roller under rear thigh | Roll between knee crease and glute fold |
| Quadriceps | Face down, roller under front thigh | Roll between hip crease and knee top |
| Glutes | Seated on roller with crossed ankle | Roll across outer hip and gluteal tissue |
| Upper back muscles | Lying face up, roller across shoulder blades | Roll between shoulder blades, supporting head with hands |
| Lats | Side-lying, roller below armpit | Roll upper side torso, avoiding lower floating ribs |
Each muscle group requires supporting your body weight with your arms or opposite leg to control intensity. Keep the roller on soft muscular tissue rather than rolling directly over bony joints. Glide slowly along the muscle belly, pausing whenever you locate a tight knot until the sensation softens.
Why rolling speed and pressure matter
Moving too quickly across a muscle makes it difficult to maintain controlled pressure and can cause muscle tissue to tense defensively. Self-myofascial release relies on gradual, sustained contact that allows muscles to relax under the roller. Gliding with slow, deliberate passes gives you better control over tender areas.
Modulating your body weight is essential. If a muscle feels overly sensitive, press your hands and opposite foot firmly into the floor to lift your body and reduce pressure on the roller. Breathing steadily keeps your body relaxed, whereas holding your breath causes muscles to brace. For smaller areas where a wide cylinder cannot concentrate pressure, comparing a foam roller vs massage ball helps clarify when each tool is appropriate.
Body areas to avoid completely
A foam roller is designed strictly for broad muscle bellies, not skeletal joints or the spine. Rolling directly over the lower back places unsupported pressure on lumbar vertebrae that lack the protective framework of the rib cage. In the upper back, keep rolling focused on the muscular tissue between the shoulder blades rather than pressing directly onto the vertebrae. Crossing your arms across your chest pulls the shoulder blades apart so the roller contacts the upper back muscles.
Never roll directly over joint capsules, such as the kneecaps, hip bones, elbows, or ankles. Avoid the neck, where major blood vessels and delicate cervical vertebrae are vulnerable to compression. Rolling over acute muscle strains, bruises, swollen joints, or skin lesions is also unsafe. When dealing with deep hip tightness near the groin, dedicated options like a psoas tool offer guided mechanics; read our guide on how to use psoas release tool for targeted positioning.
Targeted recovery tools to pair with foam rolling
These are scored on the Chill Score, which weighs performance 35, build 25, value 25, safety certifications 10 where it applies and warranty 5. None of these two manual mobility tools carries a stated safety certification, so all score 0 for safety.
| Product | Chill Score | Perf. /35 | Build /25 | Value /25 | Safety /10 | Warranty /5 |
|---|---|---|---|---|---|---|
| Thrival Relief Pro | 9.5 | 27 | 19 | 19 | n/a | 0 |
| LiBa Trigger Cane | 9.4 | 26 | 18 | 19 | n/a | 0 |
Scores run from 9.2 to 9.8: each product’s point total is placed on that range, so more points always means a higher score. Safety counts only for powered gear or where the listing states safety features; where it does not apply, the score is taken over the remaining 90 points.
For additional rolling gear and travel options, explore our guide to the best foam rollers as well as our selection of the best foam roller sets.
Foam roller technique in practice
- Support your body weight. Place your palms and feet firmly on the mat to adjust how much pressure bears down on the cylinder.
- Maintain a deliberate pace. Glide with slow, controlled passes along the muscle length instead of rapid back-and-forth friction.
- Pause on tender knots. Hold sustained pressure on sensitive trigger points until local tension eases, without forcing into sharp pain.
- Breathe continuously. Take slow, deep breaths throughout the movement; holding your breath causes muscles to brace defensively.
- Keep sessions focused. Spend a modest duration on each muscle group to avoid irritating superficial soft tissues.
Common mistakes
- Rolling directly across the lower back or neck vertebrae.
- Placing the roller directly on bony joint caps like knees and hip pointers.
- Moving too quickly along the muscle, treating the cylinder like a rolling pin.
- Tensing the target muscle or holding your breath during rolling.
- Applying aggressive pressure onto bruised tissue, inflamed bursae, or acute injuries.
Common questions
How often should you use a foam roller?
Foam rolling can be included as part of a regular warm-up or cooldown mobility routine depending on your personal comfort. Gentle, controlled passes across tight muscle groups are typically sufficient. If muscles feel sore or bruised from previous sessions, allow them time to recover before rolling that area again.
Should you foam roll before or after workouts?
Foam rolling can be used both before and after exercise. Prior to a workout, controlled rolling with light to moderate pressure helps prepare muscles for movement. Following exercise, rolling with slow passes and brief pauses on tight spots helps ease post-workout muscle tension.
Why does foam rolling cause discomfort?
Discomfort occurs when mechanical pressure is applied to tight muscular tissue and trigger points. While a mild to moderate ache is common as tissue compresses, the sensation should never turn into sharp, stabbing, or radiating pain. If you experience numbness or tingling, stop rolling immediately.
Can you foam roll your lower back?
You should not roll your lower back. The lumbar spine lacks the structural support of the rib cage, and rolling directly across it places unsupported mechanical pressure on lower vertebrae and can cause lower back muscles to tighten. Focus rolling on the glutes, hips, and upper back muscles instead.
What is the difference between a foam roller and targeted mobility tools?
A foam roller features a broad cylindrical surface suited for rolling large muscle bellies such as the quadriceps and calves. Targeted tools provide specialized mechanics that a wide cylinder cannot match, such as incline calf stretching on a slant board, hook leverage for back knots with a massage cane, or angled pressure for deep hip flexors.
Sources: Amazon product listings for the recovery tools named above, collected 10 October 2026.
Back to all foam rollers and accessories.